My Process & Skills (7) Human Rights, Human Wrongs

This is my eighth and the last entry for this semester.
Our class had a final assignment called “Human Rights, Human Wrongs”.

“Human Rights, Human Wrongs” is a poster assignment that allows the student to chose and interpret a social issue of interest to him or her. The student will voice their opinion in the chosen topic by creating a visual, conceptual statement using the juxtaposition of type and image.
The poster is directed at the general public and it’s aim is to create awareness for the issue and invite the viewer to question or consider his or her point if view on the topic. To achieve this, use the medium to your advantage. The poster is a medium whose intent is to grab the attention and draw the viewer in. It can be a powerful medium when designed and executed successfully.


The topic I took was child labor abuse in apparel industry, especially in brands so-called “fast-fashion”.

The other day, one of my ESL teachers said, “You fashion-conscious students must buy the fast-fashion clothing wisely, because it’s cheaper than the high-end brands and as fashionable as them! haha!” — I couldn’t believe what my ears heard. Of course, my ESL classmates majoring fashion design never agreed with this teacher.

And I noticed that many American people like her never think of what a fast-fashion means. They never care the reason why fast-fashion brands can sell their products in such a low, too much low prices. They can’t imagine what has happened in the opposite side of the earth, they don’t pay attentions to that kind of news or documentary films.

Shame on us. It reminds me an article about the Tazreen factory fire that killed 112 garment workers, and the Rana Plaza building collapse killing 1,129 people. No, honestly, I totally forgot the names of the buildings and the numbers of killed workers in Bangladesh. All I remembered is this featured image of the article.

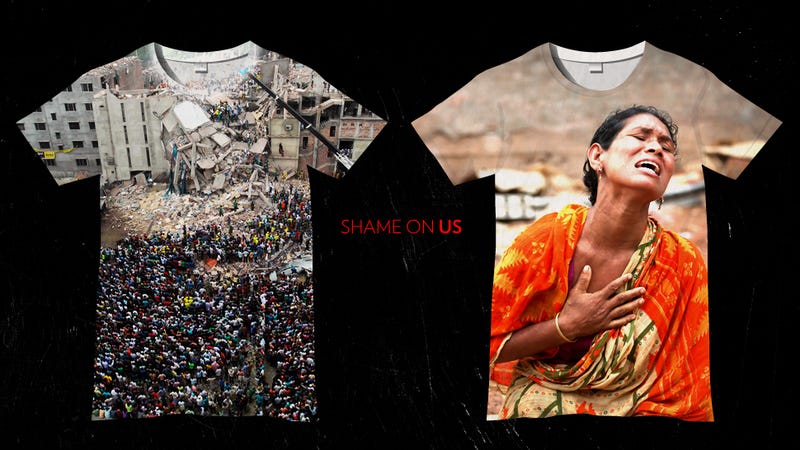
http://jezebel.com/whats-the-solution-to-the-worlds-sweatshop-problem-511688272

Well, well, I never say that I’ve never bought fast-fashion clothing ever and forever. Sometimes I do buy their cheap products, as you do. But when I saw the store is filled with tons of cheap mass-products and it looks like mountains of garbage, it hurts my heart every time. I feel so guilty to buy a T-shirt in $9.99. Am I a wise customer, indeed?

So I went to “fast-fashion districts” at Fifth Avenue. You might know where it is, very close to our University Center. I took some spy photos (again! I’m quite good at it), and designed an opinion poster concerning child labor abuse.


The more cheaper we buy clothing, The more younger sweatshop workers become. Someone should stop this bad loop, and it must be us, customers. We can be more and more ethical.

You can use this poster to your social activities. For example, a protest against demonstration on the street like this.


My Process & Skills (6) Twin Box


This is my product for Twin Box Project.

Build two 4″x4″x4″ boxes. Then, present 2 companion concepts using your boxes. They can be opposites, twin deities, or any pairing that you would like. The idea is to communicate your concept through these two boxes.

  • To think conceptually
  • To recognize and use the power of metaphor
  • To gain experience solving problems three dimensionally

I chose the theme “Depth/Height” by the result of a majority vote in class. Other themes are “Night/Day” and “In/Out”.

To depict the concept in three dimensional, once I tried to use popsicle sticks, and it totally failed. Then I found a pack of ‘golf pencils’ at Staples. I got cheap 200  short pencils by $15. Not so bad.


I measured the height of pencils, neatly arranging in line. Then I built them up to express “Height”. Unexpectedly, it looks like a Christmas tree, while I had imagined it’s gonna like a bonfire.


“Depth” box took so much time. I spent about four-times hours compared to “Height”. I cut them up with a saw, sharpened them by hand pencil sharpeners, and sanded them by a rough file and sandpaper, to arrange in line according to height. There are 14 pencils on one side, which means there are total 196 pencils on a box.


I was so surprised that most of classmates and my instructor didn’t believe the pencils were hand-sharpened. Yes, they were!!! I did!!! Until my fingers became swollen, and further and further!!!

They screamed “Why don’t you use an electric sharpener!?” And my answer was “It didn’t work for this kind of sensitive work. Automatic equipment sharpens too much than I desired.”


To me, it was not the 2 BOX project, but the 200+ PENCIL project. But I’m happy with it.


My Process & Skills (5) Photo Book

This is my product for Photo Book Project.

(I don’t know why but I couldn’t upload my photos on this blog, so I posted them to my site and linked to them below.)


For this Book Project, our class had the same theme as Photo Essay Project. Since I finished my Photo Essay with “Texture”, my book naturally has the same theme.

I named this book “You can’t touch this”. There are no captions for each photo, I only put this statement inside of the cover, as an introduction.

More than twenty years ago, a certain hit tune of M.C.Hammer had hailed around the world. A Japanese little girl also loved it, and interpreted the lyric; “Anything essential coolness is untouchable to your hands, because it’s always intangible.”

Since then, I have been fascinated to release a shutter to it. Something far away, something over the fence, something only visible in a finder. Something tactile but not touchable. All photographs in this book were taken in New York City 2015, and have a kind of texture. Unkempt plants, stickers placed by hands, or old trodden lacking pavements. We can see some patterns and orders in them, but it’s not with a computer-measured neatness. An error attracts us to touch it, just like a hole in a hand-knitting sweater.

But you, and even I, can’t touch this. These are all tactile things that you can only feel its beauty through printed pictures.


I used a technique of accordion folding, and chose red and black cardboard to the cover page. All I focused on was “Texture”.

These are some of mock-ups, which were made by recycled paper, small sticky tabs, a cardboard which picked up from the refuse room of my apartment.


My Process & Skills (4) Photo Board

These are my long journey of Photo Essay Project. http://processandskills.com/2015/10/31/my-process-skills-2-photo-essay/
http://processandskills.com/2015/11/08/my-process-skills-3-photo-editting/

And, this is my final presentation board of Photo Essay Project. 12 pictures on a 15 x 20 inches light-gray board.

As writing before, once I lost the theme. And it was found at last, with reviewing hundreds of photos I took. These two photos became my key principle.

I’m not sure what these are, though I myself took pictures of them. The one is a discarded vase on the roadside. It has been thrown away as a trash, because of its crack. But it’s beautiful. The other is a lighting covered with a mesh net, at the entrance of Vera List Center (6 E.16th building). I took this for killing time while I was waiting for the elevator (Yes, the most frustrating one in our school).

“Texture” — that’s what I found from these 2 photos. So I chose and edited 12 photos, through exploring the texture of them. My eyes caught abstract pictures, and lost meanings on it. Finally, human-beings have totally disappeared from my choice.

IMG_9554.jpg

12 photos were selected as 3 each by 4 sets of similarities: “Something litten”, “Something fragile”, “Something dotted”, and “Something to be palpated”. I made my rough sketches with thumbnails on my notebook. And shuffled them for putting on the board. You can see the difference between the sketch and the final board.

I cut all of my 5 x 3 photos into squares. Seeing a picture in the typical photo size (such as 3×5 or 4×6), your eyes naturally seek “What is seen? What did the photographer take?” because the size has meanings. However, I just wanted to let them be as collections of “Texture”. I must fit them into the exact same size in flat, so that they become more and more abstract.

IMG_9594.jpg


Bottle Project: Reveal.Conceal.

IMG_0518 (1)

For the past month (or so), our class has been dedicated to the Bottle Project. The prompt was to take two empty Fiji bottles- a liter each- and transform them using any medium or any technique to portray two companion concepts. Let the brainstorming begin as you can see above! Don’t worry those are only two pages of the six.

From there, I decided to explore the idea of Reveal and Conceal because I very quickly focused on playing with wax and melting it over the bottles in some capacity. The initial concept was to construct a candle using one of the Fiji bottles as a mold and have the wax melt over the other Fiji bottle which would conceal whatever was inside. The problem with falling in love with a technique so early on is that it is so hard to let it go when it just isn’t working!

I spent the next 2 weeks continually building candles, melting them, and getting a lot of the below over and over again!

unnamed (1)  unnamed-1 (1)


At this point, I was definitely having more fun with the inside bottle. I made small strips of paper that have the prompt “When I am alone in my apartment…” and had pretty much everyone I saw finish the sentence. It was great getting to interact with everyone and see the different levels of uncertainty people had with this. I then had them push the paper into the bottle themselves to keep their anonymity.

IMG_0510

It was time to move on with the outside bottle especially since the wax didn’t necessarily enhance my reveal/conceal concept. After researching new ways to make a mold of the second bottle, I decided on paper mache to build a cast that could open and close revealing the inside bottle.

IMG_0403 (1)

From here, I knew that I needed to paint the outside of the bottle to make it more graphically appealing as well as integrate it with the inside bottle. I decided on staying with the black/white/grey color scheme but playing with a darker background and white typography. Therefore, I painted grey horizontal strips that progressively got darker down the bottle. While I was questioning the grey rings and thinking about changing it to just black, Carmile so nicely pointed out that it plays into the idea of people’s layers and what everyone choses to reveal and conceal to the world. Then adding typography to the outside really brought it all together and integrated the inside bottle and outside shell nicely!

IMG_0511

Below are a few pictures of my finished bottles. Thanks for reading and enjoy!

IMG_0512IMG_0513

IMG_0516


Manhattan Street Performance: A Photo Essay

The process of developing my photo essay over the course of two months was an interesting one.  For worse or for better, very little of my original idea survived to the final stages of the process.

If this project taught me anything (in fact, it taught me many things), it is that sticking to your original vision of a final product can actually limit its development. As my Digital Layout professor KC Witherell says, “Don’t get married to an idea.”  This project, like all others at Parsons, put me to the test: could I gracefully allow my ideas and my work to change from my original vision?

When we were first assigned the project, I had my heart set on photographing the performers who jump on the subways and dance on the poles; I saw them everywhere I went during my first month in New York, and I thought that the way the performers affected the body language of the subway riders was very interesting.  People immediately cast their eyes to the floor, to the wall, anywhere but at the performers.  By betraying even the slightest hint of amusement or attention, it was as if the subway riders were entering into a contract with the performers: you must tip us.

Alas, the very day I decided to photograph the contrast between the performers’ body language and the subway riders’ body language was the last day I saw the subway performers until–get this–3 days after the final photo essay was due.  I spent the first weekend of the project riding around the city for hours until finally I decided to cast a wider net and photograph performers anywhere I found them, and any form I found them.  I photographed violinists, break dancers, saxophonists, children’s entertainers, bands; everyone I could find.  I tried to get close-ups of the performers’ faces and the spectators’ faces, looking for contrasts.

After the first critique with Michael Durham, former photojournalist at Life Magazine, it was decided that the close-ups weren’t really working, and in fact the most interesting photos were of the breakdancers.  Photos from days of photographing were discarded.

At that point, too, I needed to come up with a concept for the text that would accompany my photos when they were bound into my final book.  Luckily, with inspiration from Michael Durham, the idea to interview the breakdancers for my text came quickly, and the following week I went back to City Hall where I had initially seen the street performers to ask some questions.  After weeks of observing street performers, I had grown very curious about the lives they lead.

When I got to City Hall, I saw that many of the performers I had originally photographed were there again in the same spot, nearly a month later.  I watched a performance, took some photos, and then approached some of the men for an interview.  I am naturally shy, so the thought of choosing people as my subjects in the first place had been a bit nerve-racking; the thought of interviewing my subjects was even more so.  Ultimately, though, I’m so glad I chose to do these things for my work, because the results were so rewarding.  This is the work that I’m most proud of (so far) at Parsons.

With my photos taken and text written, I set about the task of laying out my book and then binding it.  This took some weeks of revision as well.  Some photos of my mock-ups:

This slideshow requires JavaScript.

I decided to make my book into a circle accordion.  That way, my book would fit neatly into a cover and could be pages through as an ordinary book, but could also be displayed in a circle to mimic a street performance: photographs of performers in the center; spectators circling around.  I had to scale my book down slightly for practical reasons. Finding reasonably priced and manageable ways to print a document that’s 6.25 inches by 85 inches was unsurprisingly a bit of a mission!

Here are some photos of the (almost) final version (small refinements will be made before the end of the semester):

This slideshow requires JavaScript.

Though the process was long, this was a project that I enjoyed from start to finish, and learned many things along the way.  I discovered that I love bookbinding, and that interviewing subjects isn’t half bad either.  I’m looking forward to producing many more photo essays in the future!

This slideshow requires JavaScript.

Photo Collage: David Hockney-esque

For our latest project in Process and Skills, we were asked to study David Hockney’s “joiners” or his cubist photography. I really appreciated reading about his views on photography and how his new technique came to be. In an interview he says the following about photography- “So, the moment you’ve looked at [the photograph] for even four seconds, you’re looking at it far more than the camera did. It dawned on me this was visible, actually, it is visible, and the more you become aware of it, the more this is a terrible weakness; drawings and paintings do not have this.” From this, he decided to break down this weakness and try to use photography to show space and time by layering multiple images as though he was approaching it as a drawing or painting.

IMG_0156

Above is my first attempt with his technique! I decided to use a manageable object, so that I wouldn’t get overwhelmed and I could really focus on understanding his process. After taking a million pictures of this fire hydrant and probably worrying a number of people around me, I knew I wanted to show it from the perspective of standing above. With a few tweaks in class especially on the background, I think it is starting to give off that impression!

Self Poster Project

For our first Project in Process and Skills class we were asked to create black and white self poster based in the Punk Rock era posters and Japanese, Polish and Russian posters starting from a photo taken in a photo booth. The poster should have only our initials or name and just one photo.

The project had so many restrictions that at the beginning I thought it was going to be horrible but working on progress and researching helped me to develop a lot of good ideas with just a photo and my initials.

Its was amazing to see the final posters of all and  how everyone turned 2 things into different  great ideas.

Here is my process and my final poster.

Featured image3rd poster

2nd posterselfportrait4

Project 1 – Self Portrait Poster

For our first project in Process and Skills, we constructed black and white posters using only photobooth selfies and found typography for our initials. I really appreciated the strict parameters of this projects making it more about problem solving and the steps to the final image as opposed to the image itself. It is amazing what you can do with a photocopier and some scissors!

IMG_9629

IMG_9528

The image to the left is my original photograph. I was instantly drawn to the hands and the shape they made. I spent A LOT of time at the photocopier playing with contrast and scale of the hands, which you can see in the final image to the right. Seeing it in a small scale image, I really love the diagonal the hands form and the movement that happens with the different shades of grey and black!

P.S. Fun picture of everyone’s projects together!

IMG_9529

Why Process and Skills is the greatest class in the universe.

Maybe the title is a little dramatic, but I really want to mention how this class helped me so much.

I remember being so intimidated by the first assignment. The idea of going into a bar alone to use a photo booth terrified me. I pushed through because I knew I needed those pictures to complete my photocopy assignment. I had no idea what I was doing, I did it wrong the first time, so I tried it over and over again. When I finally understood the instructions, I started to have fun with it. That’s what was missing on the first try. I learned not to let my fear get in the way of my creativity.

I knew Professor Gruda was concerned with me. I really thought I was hopeless. I just didn’t know what to do. She encouraged me to email her with my ideas and progress. She was completely honest with me about how finished everything looked. I found this extremely helpful . Why wouldn’t I want to be the best?

While reviewing my photo essay pictures, Professor Gruda told me to “put my heart into my work.” I had no idea what that meant! It stuck with me for awhile, I had a feeling it was important.

I would say that work and research for this class took up about 50% of my week. I admit, I thought the work was ridiculous at first, but I understand it now. This work is fun, and exhilarating. It was starting to become my life, and I have never felt so happy. We got to look at art everyday, go to museums, and then we got to talk about how much we enjoyed them! I get graded for this, how lucky am I.

In my experience, the most exciting part of these projects is seeing the end result. I loved seeing everyone’s work, as well as having my own work to be proud of.

I experienced being “in the zone,” while doing the photo book project. I have always wanted to create art based off of my favorite bands. I was so excited to see what it would look like. I had this vision of it in my head for so long, and this was finally my chance to make it real. I stayed up late  nights, used $50.00 in print credits just to see how the artwork would print. I realized what a long and complicated process creating a book was. There were issues with pixelated images, uncentered text, sizing, color, etc. The only way to fix it was to do more research. I had to go back and figure out what to do to make this book perfect. There was nothing stopping me, because I was so excited to see the end result.

In process and skills you will learn a lot about yourself, create art based on things you love, and share it with people who understand and care about you. Professor Gruda is extremely passionate about her classes, and goes out of her way to help students, to be the best.

To anyone who will be taking process and skills, yes, this class will become your life for 1 semester. However, it is an awesome life, and you should be grateful. If you’re struggling, just try to remember that this is fun. It is challenging, not always easy, but fun.

I now understand what Professor Gruda meant by “putting my heart into my work.” Staying up from 8 PM to 5 AM straight, doing work for this class, is putting my heart in. I don’t even want to sleep because I am so excited to show my work in class. I have been injected with some crazy magic. I have been given a gift, thank you Professor Gruda!

Hooray!