The Bottle Project

The bottle project assignment required us to demonstrate using two plastic bottles. The bottles were used to exhibit and bring two matching or opposing words to life. This demonstration could be displayed in any possible way, there were no restrictions. I decided to use science to illustrate my ideas and concepts, and to engage the viewer further more through live experiments conducted on the bottles.

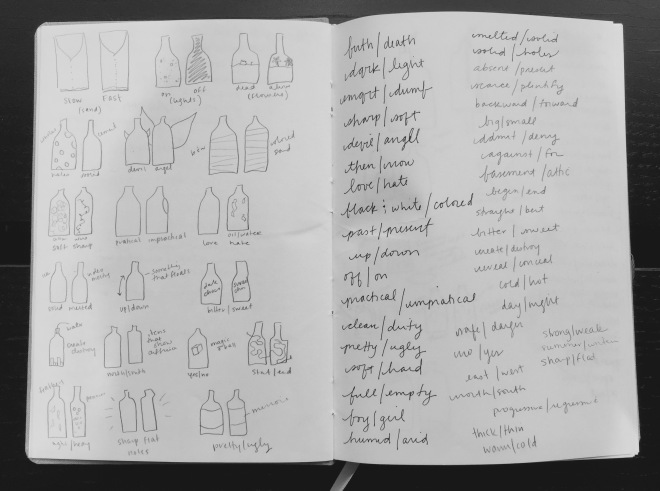
 We were asked to create 50 thumbnail sketches of our ideas and concepts. The bottles represented two words that had some sort of relationship (antonyms, synonyms, etc.)

The final three selections I went with were:

Calm v/s Excited

Construct v/s Deconstruct

Social v/s Antisocial 


  1. Calm v/s Excited (or hyper)

‘Calm’ was extremely easy to display. I had diluted coke in one bottle with no fizz. Diet coke + Mentos did the trick to demonstrate the word ‘excited’ in the other bottle. When diet coke was put into a newly poured bottle of diet coke it immediately fizzes up due to the carbon dioxide produced by the mixture, this gives it a feeling of being hyper or excited. Unfortunately I’m having difficulty in embedding videos or uploading pictures so I am adding links. Hope it works!

Click here to view.

2. Construct v/s Deconstruct

I used two balloons, some vinegar, and Eno powder for this one. The balloons were attached to the nozzle of the bottles and as soon as the powder was poured into the vinegar the balloons began to inflate. While both the balloons inflated, I poked a hole in one of them to demonstrate the words “construct” and deconstruct” at the same time.

This was the end result of the experiment.

3. Social v/s antisocial

This was so much of fun to work with, but yet the most hands on experiment. After plenty of trial and errors did I finally get it right. The social bottle was extremely easy to show. I mixed water, food colouring, Savalon. All these were soluble liquids that blended well to illustrate the definition of the word “social”.

“Anti-social” was a bit tricky to do. After three trials I finally accomplished what I had initially aimed to do. I used immiscible liquids for this one, there was vegetable oil, water, milk, and maple syrup. Due to their various densities they all settled as separate layers instead of mixing as one. 
Bottle Project

The bottle project was a lot of fun to put together.  The idea of creating 50 thumbnails originally scared me, but then as I got to it, I had a really good time creating new ideas for word pairings.  I have attached the original 50 thumbnails here to take a look at.  I hope this website link works as unfortunately I can’t seem to upload any files or pictures currently.

50 Sketches

After I was finished putting the sketches together, we narrowed down the choices to three that I was going to reach further into.  I chose Death and Taxes, Trapped versus Freedom, and Inner versus Outer.  There were many fun combinations that I had put together, but these three really allowed me to deconstruct the bottle as well as come up with many solutions for the words. I saw the most promise in those three, so I created multiple sketches for each one.  Those solutions can be found right here.

When it came to selecting what materials to use and which one of those final sketches I could put together, I decided on Death and Taxes.  I wasn’t quite sure if I was going to rip open the bottle completely or if I was going to put a skull in the middle for the Death bottle, so I started with the tax bottle. My teacher had said that she liked the idea of the mailbox for the taxes bottle, so I went ahead and created an actual mailbox.  I had the mailbox as an outside entity at first but then decided to use the bottle, turn it over on its side and make it.  Inside the mailbox was an envelope that I stuck inside, with a sticky note on it saying April 15th.  I then took a red piece of paper and stuck it on the outside in the shape of the flag you see on a mailbox.  I thought the design looked pretty nice, but then went back to how to create death.

For the Death bottle, I surfed the internet for something to spark my mind, and had the hardest time finding something I wanted to pursue. I then came across this idea for a hologram that you can make, so I went around to articles and videos on how to do that.  I cut the bottle open, removing the cap and the bottle neck.  I then took the rest of the bottle and cut it up so that it became almost an upside pyramid.   I put a couple of those sticky notes saying April 15th on the outside and then placed the bottle on to my iPad, which had four rotating skulls on all sides of the bottle.  The result of doing that, was that now they are reflected to the center and created what looked like a hologram.  I like the fact that the mail comes usually during the day, and then for the death bottle, you had to turn the light off for the full effect, giving it a nice contrasting pair.  The result of those bottles, which contains videos as well can be seen here and here.


“Before” and “After”: Bottle Project

The Bottle project requirements were very simple:  take two Fiji bottles, along with two related concepts, and produce a design piece portraying those concepts.  Other than the Fiji bottles, the materials were up to us.  However, as anyone in art/design fields might agree, unlimited materials, unlimited possibilities, can be quite overwhelming in the early developmental phases of a project.  This was definitely the case with me–it took awhile to develop a solid concept for my bottles, and a few tried-and-failed experiments.

After the initial brainstorming with 50 thumbnails of various ideas for the bottles, I was still baffled as to what I was going to do.  My ideas were silly, or would be impossible to implement, or were just plain bad.  The best idea I came up with in that first round revolved around the words “nervous” and “excited”…I would reshape the bottles as best as I could to look like stomachs, tint them slightly pink, and fill one with butterflies suspended on string, and the other with a mess of knots.  It wasn’t a great idea, but I made myself work through it anyway to see what would come of it.

To reshape the bottles, I tried to melt them in the oven  (the things we do for art).  At first, I put them in without the caps on…and nothing happened.  On high heat for around 40 minutes, the bottles really didn’t change shape. Then, for some reason, I put them in with their caps on, to see what would happen.  Then, believe it or not, the bottles shrunk…and the normally square shape of the Fiji bottles became round.

I then tried putting in the butterflies and knots to see how my bottles looked, and just as I expected, they looked juvenile.  At this point I decided to rework my idea and shoot for a new concept, beyond what was in my fifty thumbnails.  Professor Zaino encouraged me to make a larger concept out of my two choice words.  I also decided to give myself an additional limitation to push against, to avoid multiple trips to the store and far too much wasted money as I worked through and re-worked my ideas.  I challenged myself to make my project as cheaply as possible.

The new idea, after that, came surprisingly quickly.  I decided that my new bottles would represent the words “before” and “after,” and my larger concept would make a commentary on environmental issues.  I decided to make one bottle as if it were a birthday piñata: covered in paper maché, and then green, blue, and brown crepe paper to represent the main colors of the earth .  My second bottle would be filled with trash.  As luck would have it, I was able to use one of my shrunken, melted bottles from my previous experiment to fill with trash and then place inside the colorful piñata bottle.  I also constructed a small bat covered in brown crepe paper as well.

So here we have it: a bottle made to look like a birthday piñata, representing the earth, alongside a bat.  When the piñata is opened, rather than candy and sweets, we find garbage.  Before pollution, and after pollution.  My idea to make this cheaply/with limited materials definitely worked with my concept as well!  Although it took a little while to get my final idea, I’m glad I had to work through the earlier ones.  Without my previous mistakes, I would not have known how to fit one Fiji bottle inside another!

(Currently unable to post any photos, will do so when possible)

Bottle Project

In our Process and Skills class we just recently wrapped up our 4-week Bottle Project, focused on coinciding or contrasting themes.

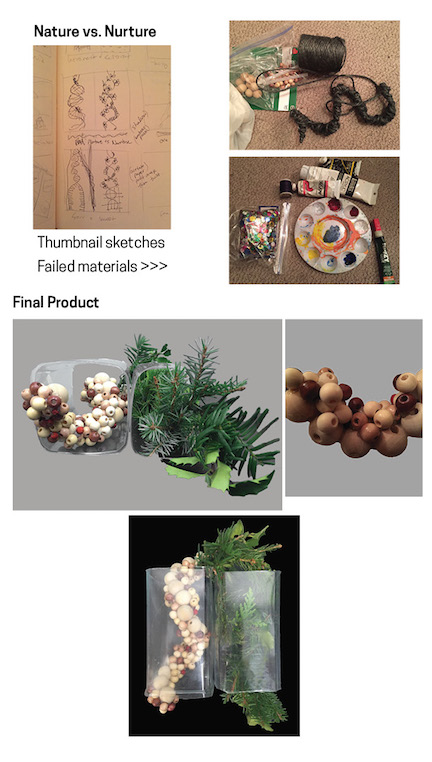
Initially we had to start off by putting together 50 thumbnail sketches of what idea we would like to have and I can confidently say that the large majority of my sketches were absolutely ridiculous and infantile. However, this allowed me to get the silly ideas out of my system and focus on those that were more interesting. I ended up deciding on “Nature vs. Nurture.” My idea was to create a curved DNA band with beads and a curved band to represent nature (flowers, leaves etc.) to intertwine to the DNA to reflect how much both pieces take part in a person.


Next I set out to get my materials and start putting the project together… yarn, wire and glue, and then thicker wire, then shiny beads, then some more yarn, then decided to go with thread, then gold wire–too thin-then bought some shiny round things don’t know what they are–too small-glue didn’t stick so decided to go with the glue gun- ran out of sticks-bought more- tried to paint the shiny beads-CATASTROPHE-beads all over my living room floor-paint won’t dry-paint all over my hands-super glue won’t come off-decided I might need to change up my game plan for the DNA-on the other side the yarn was too unrealistic for the greenery so-went to Central Park-discretely took some leaves, berries and branches-hope no one saw…- Back to the DNA: tried finding wood beads-sold out-tried another store-wrong size-tried online-will arrive in February from China…eventually found a store that carried them and successfully completed the DNA! As for the greens, I took the making a wreath approach and added little by little real greens to heavy wire and twisted it to look like DNA..not too bad!  Took about a million tries and a ton of visits to the store, but it all eventually came together and I am happy with the final result of the project.

bottles_blog

Bottles

For my Bottles project, I was initially stumped on what I could do. I wasn’t crazy about my sketches and none of the ideas I had really stuck to me. I was also in the process of finishing up my Photo Essay since I decided to redo the essay the week before it was due so I really wasn’t giving this project my full attention.

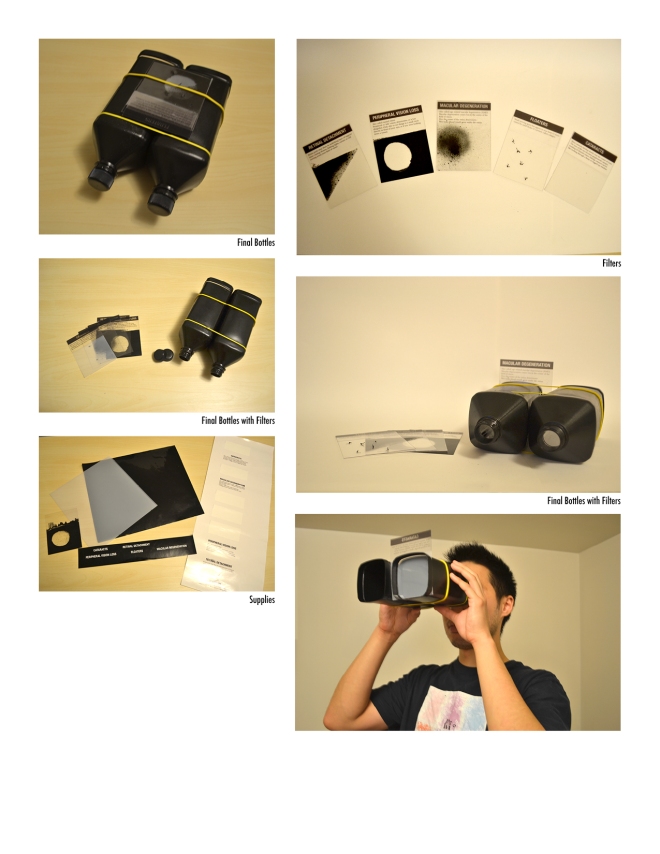
My first bottle idea that I really liked but never executed came to me when I was walking my dog. As I was walking him, I noticed heaps of garbage bags occupying the sidewalk and obstructing our way to walk. Then I thought about the assignment and the fact that we’re using plastic bottles and adding even more to the waste we produce and adding to landfills. I wanted to do a time lapse video of all the garage I produce in a week and document that and in an alternative week, I would reduce my footprint and restrict myself to only producing waste that would be able to fit into the bottle. This first idea lead to me explore beyond the obvious. I started to think about my past and what influences have impacted my life. I initially started with my geography background and then moved to my healthcare background. Listing out words that were important concepts in both of those worlds, I landed on creating a set of binoculars that would reflect visually impaired and perfect vision.

I cut out the bottom of both the bottles and started to think about creating filter lenses to show different visual impairments. At some point during my brainstorming, kaleidoscope popped into my head as well. I started with a list of eight that I narrowed down to five after coming across some technical difficulties with implementing three. My original list consisted of: myopia, hyperopia, presbyopia, cataracts, floats, retinal detachment, peripheral vision loss and age-related macular degeneration. Since, I wanted the binoculars to be reflective of real life objects in that given point in time the person is looking into it, I had a hard time demonstrating myopia, hyperopia and presbyopia. With the aforementioned, it seemed like the only way to be able to show this properly was to actually place a static picture on the filter. This would change my original idea of having the binoculars be interactive and reflect what is being seen at that point in time so I decided to give those three up and worked with the others.

My process then led me to research and get some images of what vision would be like for the remaining five impairments. I knew right away that I wanted to use plastic sheets to create my filters so I went down to Canal Plastics and picked up a few pieces. I also knew that for many of the filters, I would use spray paint to create the filters. At one point, I did get stuck on the floaters filter because I wanted it to be as realistic as possible so I wanted the black dots/floating lines to actually be able to move in the filter. This wasn’t as easy as I thought it was going to be. In the end, I settled for piercing holes through the plastic and using tread to create the floaters.

I also wanted the filters to be educational so I used the vinyl sticker printer in the AMT lab to print labels for the tops of each filter. At first, I wanted to sticker cutout the names of the filters and have the letters punched out. After the stickers were cutout and the letters were removed, it became apparent that this would not work because of the small counters in some of the letters so I opted to have the entire label printed on clear vinyl instead to still give the same look.

As for the actual bottles, the bottoms were cut out and a small slit was cut for the filter to sit in, but I still had another problem. The bottles needed to be attached together somehow and still allow for angle adjustment for different pupil distances. At that point, I decided to use elastic bands to hold the filters together and the cap of the bottom became a wedge in the middle to create the perfect angle. This solution actually also automatically solved another problem I had with the filter always falling out when people moved around to look at different things in their surroundings.

bottles imagesbottles images2

Bottle Project: Reveal.Conceal.

IMG_0518 (1)

For the past month (or so), our class has been dedicated to the Bottle Project. The prompt was to take two empty Fiji bottles- a liter each- and transform them using any medium or any technique to portray two companion concepts. Let the brainstorming begin as you can see above! Don’t worry those are only two pages of the six.

From there, I decided to explore the idea of Reveal and Conceal because I very quickly focused on playing with wax and melting it over the bottles in some capacity. The initial concept was to construct a candle using one of the Fiji bottles as a mold and have the wax melt over the other Fiji bottle which would conceal whatever was inside. The problem with falling in love with a technique so early on is that it is so hard to let it go when it just isn’t working!

I spent the next 2 weeks continually building candles, melting them, and getting a lot of the below over and over again!

unnamed (1)  unnamed-1 (1)


At this point, I was definitely having more fun with the inside bottle. I made small strips of paper that have the prompt “When I am alone in my apartment…” and had pretty much everyone I saw finish the sentence. It was great getting to interact with everyone and see the different levels of uncertainty people had with this. I then had them push the paper into the bottle themselves to keep their anonymity.

IMG_0510

It was time to move on with the outside bottle especially since the wax didn’t necessarily enhance my reveal/conceal concept. After researching new ways to make a mold of the second bottle, I decided on paper mache to build a cast that could open and close revealing the inside bottle.

IMG_0403 (1)

From here, I knew that I needed to paint the outside of the bottle to make it more graphically appealing as well as integrate it with the inside bottle. I decided on staying with the black/white/grey color scheme but playing with a darker background and white typography. Therefore, I painted grey horizontal strips that progressively got darker down the bottle. While I was questioning the grey rings and thinking about changing it to just black, Carmile so nicely pointed out that it plays into the idea of people’s layers and what everyone choses to reveal and conceal to the world. Then adding typography to the outside really brought it all together and integrated the inside bottle and outside shell nicely!

IMG_0511

Below are a few pictures of my finished bottles. Thanks for reading and enjoy!

IMG_0512IMG_0513

IMG_0516


What? Two Bottles? Start Looking Sideways…

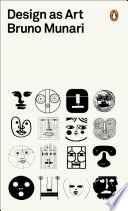
Always roaming in and out of book stores and on book sites, a few years ago I saw the book The Art of Looking Sideways by Alan Fletcher. I thought – what a visual feast. In some ways it reminded me of Bruno Munari’s book Design as Art. (BUT – not in size). The Art of Looking Sideways has over 500 pages.

The Art of Looking Sideways by Alan Fletcher publish by Phaidon Press in 2001.
The Art of Looking Sideways by Alan Fletcher
publish by Phaidon Press in 2001.

This book contemplated the differences between pictures as words – and vice versa. As Alan Fletcher states “the pleasing incongruities and serious science behind perception, process and the imagination that fills in the gaps”. A perfect book to review as we start exploring creative solutions to our bottle project.

Fletcher doesn’t set out to teach lessons. It is more of his experiences and insight that he gathered by – well – just being there and absorbing the world around him.

Here is a series of spreads from

The Art of Looking Sideways by Alan Fletcher:

A spread from The Art of Looking Sideways by Alan Fletcher

A spread from The Art of Looking Sideways by Alan Fletcher

6

8

The Art of Looking is wonderful inspiration to visual awareness, an interesting compilation that will entertain and inspire all of you as you start to SEE the interplay between word and image.

• Here is a link to an interesting interview with Alan Fletcher:

https://www.youtube.com/watch?v=meKUDU0sH5w

• Here is a link to The Art Directors Club Hall of Fame page for BIO info.

http://adcglobal.org/hall-of-fame/alan-fletcher/

NOTE: more on Bruno Munari’s book Design as Art from Google Books: https://books.google.com/books?id=fIJjI0UC7AEC&printsec=frontcover&dq=amazon+Bruno+Munari’s+book+Design+as+Art.&hl=en&sa=X&ved=0CDAQ6AEwAGoVChMIzabT9uyIyQIVxT4-Ch3IzgA_#v=onepage&q&f=false

Cover for Design as Art By Bruno Munari (paperback).

Find past Munari posts about his books on this blog.